プログラミングを学ぶ中で、実際に動くアプリケーションを作ることは非常に重要です。今回は、Pythonの人気Webフレームワーク「Flask」を使って、シンプルながら実用的なTodoリストアプリを作成する方法を解説します。
このプロジェクトは、Webアプリケーション開発の基本的な概念を学ぶのに最適です。データの表示、フォーム処理、ルーティングなど、Webアプリの核となる要素を含んでいます。また、HTMLテンプレートの使用方法や、Bootstrapを利用した簡単なスタイリングも学べます。
Flaskとは
まず、Flaskとは何かを理解しましょう。Flaskは、PythonでWeb開発を行うためのフレームワークです。Flaskは単なるライブラリやモジュールではなく、ライブラリが特定の機能を提供するコードの集まりであるのに対し、Flaskはアプリケーション全体の構造を定義し、HTTPリクエストの処理やルーティングなどのWeb開発に必要な基本機能を提供します。
他の主要なPython Webフレームワーク(例:Django)と比較すると、Flaskの特徴は以下の点にあります
軽量:最小限の機能から始められ、必要に応じて機能を追加できる。
柔軟性:開発者に多くの自由度を与え、プロジェクトの構造を自由に設計できる。
学習の容易さ:シンプルな構造のため、初心者でも比較的短時間で基本を習得できる。
今回作成するTodoリストアプリには、タスクの表示、追加、完了の3つの主要機能があります。シンプルな機能ですが、これらを実装することで、FlaskアプリケーションのMVC(Model-View-Controller)パターンや、Pythonでのデータ処理の基礎を理解できるでしょう。
完成イメージ
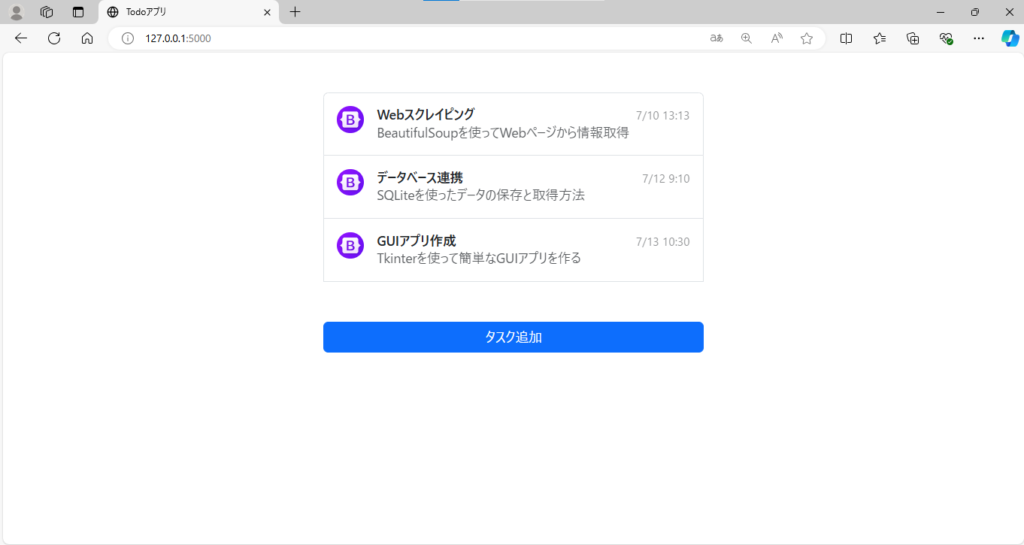
タスク一覧画面
作成したタスクがリストで表示されます。各タスクをクリックすると完了状態となり非表示になります。
「タスク追加」ボタンをクリックすると画面遷移します。スタイリングはBootstrap を使用しています。

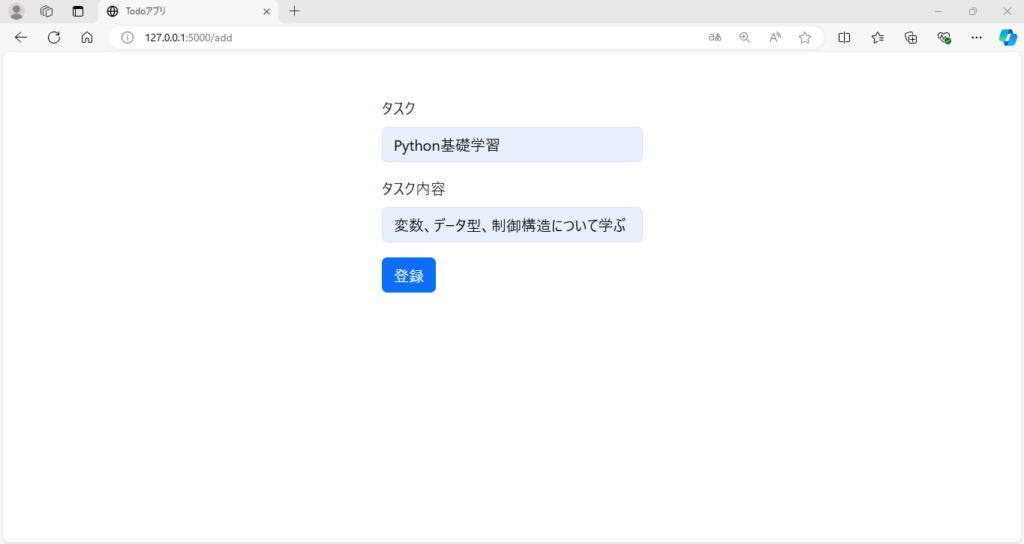
タスク追加画面
タスク名とタスク詳細を入力し「登録」をクリックすると、タスクが登録されタスク一覧画面に遷移します。

ファイル構成
project/
│
├── main.py
├── templates/
│   ├── base.html
│   ├── index.html
│   └── add.html
└── static/
    └── assets/
        └── favicon.ico
main.py:ルーティングやデータ処理、flaskのメイン処理
templates:各ルートで描画するHTMLファイル
static:imgやcssファイル
main.py
flaskで必要なモジュールをインポートし、アプリの定義・起動、データの保存、各ルーティングの処理を設定しています。
from datetime import datetime
from flask import Flask, render_template, request, redirect, url_for

app = Flask(__name__)


# 簡易的なデータ保存
todos =  [
    {'index':0,'task': "Pythonの基礎学習", 'detail': '変数、データ型、制御構造について学ぶ', 'time': '7/1 11:10', 'done': True},
    {'index':1,'task': "Webスクレイピング", 'detail': 'BeautifulSoupを使ってWebページから情報取得', 'time': '7/10 13:13', 'done': False},
    {'index':2,'task': "データベース連携", 'detail': 'SQLiteを使ったデータの保存と取得方法', 'time': '7/12 9:10', 'done': False},
    {'index':3,'task': "GUIアプリ作成", 'detail': 'Tkinterを使って簡単なGUIアプリを作る', 'time': '7/13 10:30', 'done': False}
]

@app.route('/')
def index():
    return render_template('index.html', todos=todos)

@app.route('/add', methods=["GET",'POST'])
def add():
    if request.method=="POST":
        task=request.form["task"]
        detail=request.form["detail"]
        now=datetime.now()
        time=now.strftime('%m/%d %H:%M')
        todos.append({'index':len(todos),'task': task, 'detail':detail , 'time': time, 'done': False})
        return redirect(url_for("index"))
    return render_template('add.html')

@app.route('/complete/<index>')
def complete(index):
    todos[int(index)]['done'] = True
    return redirect(url_for('index'))

if __name__ == '__main__':
app.run(debug=True)・todos:タスク名、タスク詳細、作成時間、完了ステータスの値をリストで保持しています
・/:todosの値をindex.htmlへ渡し一覧表示します
・/add:フォームのmethodがPOSTだった場合、フォームの各要素を取得しtodosリストに追加します
・/complete:タスクのインデックスが一致するものを完了ステータスに変更して一覧画面(/)にリダイレクトします
templates
base.html-基本レイアウト
Bootstrap のCDNリンクを使用して、簡単にスタイリングを適用しています。
<!DOCTYPE html>
<html lang="en">
<head>
    <meta charset="UTF-8">
    <meta name="viewport" content="width=device-width, initial-scale=1.0">
    <title>Todoアプリ</title>
    <link href="https://cdn.jsdelivr.net/npm/bootstrap@5.3.0/dist/css/bootstrap.min.css" rel="stylesheet" integrity="sha384-9ndCyUaIbzAi2FUVXJi0CjmCapSmO7SnpJef0486qhLnuZ2cdeRhO02iuK6FUUVM" crossorigin="anonymous">
    <link rel="shortcut icon" href='{{ url_for('static', filename='assets/favicon.ico') }}' type="image/x-icon">
</head>
<body>
    <div class="d-flex flex-column flex-md-row p-4 gap-4 py-md-5 align-items-center justify-content-center">
        <div class="list-group">
            {% block content %}
            {% endblock %}
        </div>
      </div>
      <script src="https://cdn.jsdelivr.net/npm/bootstrap@5.3.0/dist/js/bootstrap.bundle.min.js" integrity="sha384-geWF76RCwLtnZ8qwWowPQNguL3RmwHVBC9FhGdlKrxdiJJigb/j/68SIy3Te4Bkz" crossorigin="anonymous"></script>
</body>
</html>・{% block content %}~{% endblock %}を設定することで、子HTMLはbase.htmlを継承しつつ、各ページ設定を行えます。
index.html – タスク一覧ページ
{% extends "base.html" %}
{% block content %}
        {% for todo in todos %}
        {% if not todo.done %}
          <a href="{{url_for("complete",index=todo.index)}}" class="list-group-item list-group-item-action d-flex gap-3 py-3" aria-current="true">
            <img src="https://github.com/twbs.png" alt="twbs" width="32" height="32" class="rounded-circle flex-shrink-0">
            <!-- <img src='{{ url_for('static', filename='assets/img/icon.png') }}' alt="twbs" width="32" height="32" class="rounded-circle flex-shrink-0"> -->
            <div class="d-flex gap-2 w-100 justify-content-between">
              <div>
                <h6 class="mb-0">{{todo.task}}</h6>
                <p class="mb-0 opacity-75">{{todo.detail}}</p>
              </div>
              <small class="opacity-50 text-nowrap">{{todo.time}}</small>
            </div>

          </a>
        {% endif%}
        {% endfor%}
        <br>
        <br>

                <a href="{{url_for('add')}}" class="btn btn-primary">タスク追加</a>
{% endblock %}・{% extends “base.html” %}でbase.htmlを継承し、{% block content %}~{% endblock %}に設定を入れます。
・{% for todo in todos %}~{% endfor%}でmain.pyから受け取ったtodosリストの各値を繰り返し処理します。
・{% if not todo.done %}~{% endif%}で未完了ステータスのタスクだけ処理し描画する
・{{todo.task}}、{{todo.detail}}、{{todo.time}}各タスクの要素を描画します
・{{url_for(“complete”,index=todo.index)}}で/completeルートにルーティングし、完了ステータス対象のタスクインデックスを渡します。
add.html – タスク追加ページ
{% extends "base.html" %}
{% block content %}
        <form method="post" action="{{url_for("add")}}" >
            <div class="mb-3">
              <label for="exampleInputEmail1" class="form-label">タスク</label>
              <input type="text" class="form-control" id="exampleInputEmail1" aria-describedby="emailHelp" name="task">
            </div>
            <div class="mb-3">
              <label for="exampleInputPassword1" class="form-label">タスク内容</label>
              <input type="text" class="form-control" id="exampleInputPassword1" name="detail">
            </div>
            <button type="submit" class="btn btn-primary">登録</button>
          </form>
{% endblock %}・{% extends “base.html” %}でbase.htmlを継承し、{% block content %}~{% endblock %}に設定を入れます。
・フォームのmethodを”POST”に設定し、actionは{{url_for(“add”)}}で/addルートにルーティングにします。
・フォーム内のinput要素にname属性を設定し、main.py内の/addの処理で入力値が取得できるように紐づけを行います。
まとめ
本記事では、Pythonの軽量WebフレームワークであるFlaskを使用して、シンプルなTodoリストアプリケーションを作成する方法を紹介しました。このプロジェクトを通じて、Webアプリケーション開発の基本的な概念や、Flaskの特徴である軽量性と柔軟性を学ぶことができます。
アプリケーションの主要機能として、タスクの表示、追加、完了の3つを実装し、HTMLテンプレートやBootstrapを用いたUIデザインにも触れました。また、Flaskの基本的な使い方や、ルーティング、フォーム処理などの重要な要素についても解説しています。
ここで学んだ内容を基に、さらに機能を拡張したり、より複雑なアプリケーションの開発に挑戦したりすることができるでしょう。


