プログラミングを学ぶ中で、実際に動くアプリケーションを作ることは非常に重要です。今回は、Pythonの人気Webフレームワーク「Flask」を使って、シンプルながら実用的なTodoリストアプリを作成する方法を解説します。
少し長い記事になりますが、データの表示、フォーム処理、ルーティングなど、Webアプリの核となる要素に加えて、ユーザー認証やDB機能も開設します。また、HTMLテンプレートの使用方法や、Bootstrapを利用した簡単なスタイリングも学べます。
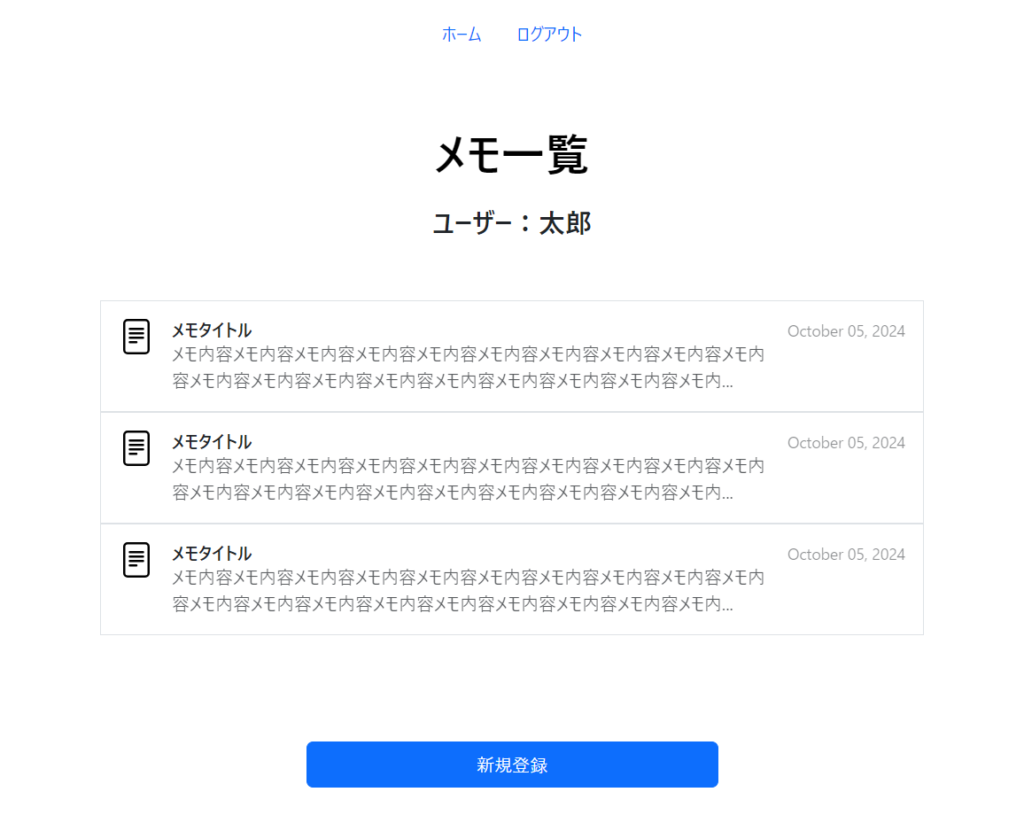
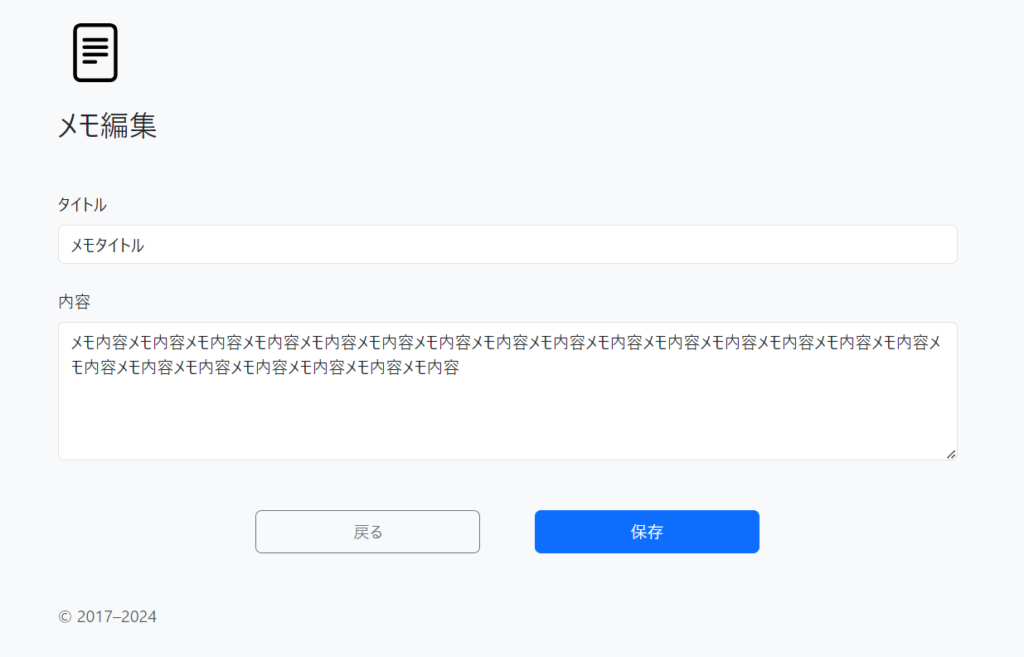
完成イメージ
・ログイン画面

・メモ一覧画面

・メモ編集画面

フォルダ構成
プロジェクト名
│  forms.py
│  main.py
│
├─static
│  ├─css
│  │      login.css
│  │
│  └─img
│          file-text.svg
│          person-add.svg
│          person-check.svg
│
└─templates
      base.html
      home.html
      login.html
      note.html
register.htmlmain.pyでルーティングや認証、DBなどのメインの処理を定義しています。forms.pyは各ページのフォーム情報を定義しています。staticフォルダ配下は、CSSや画像などのデザインの定義ファイル、templatesフォルダ配下は、レンダリングするHTMLファイルを定義しています。
1. main.pyファイル解説
1.0 コード全体
はじめのPythonファイルのコード全体だけ以下に記載し、各パートの記述を解説してきます。
from flask import Flask,render_template,request,redirect,url_for,flash
from flask_bootstrap import Bootstrap
from flask_sqlalchemy import SQLAlchemy
from sqlalchemy.orm import DeclarativeBase, Mapped, mapped_column,relationship
from sqlalchemy import Integer, String
from flask_login import UserMixin, login_user, LoginManager, login_required, current_user, logout_user
from werkzeug.security import generate_password_hash, check_password_hash
from forms import LoginForm,RegisterForm
from datetime import date

app=Flask(__name__)
app.secret_key="fresgresgesr"
bootstrap=Bootstrap(app)

##CREATE DATABASE
class Base(DeclarativeBase):
    pass
app.config['SQLALCHEMY_DATABASE_URI'] = "sqlite:///new-notes-collection.db"
# Create the extension
db = SQLAlchemy(model_class=Base)
# Initialise the app with the extension
db.init_app(app)

class User(UserMixin,db.Model):
    __tablename__="users"
    id:Mapped[int]=mapped_column(Integer,primary_key=True)
    username:Mapped[str]=mapped_column(String(250),unique=True,nullable=False)
    password:Mapped[str]=mapped_column(String(250),nullable=False)
    # relationship(note)
    notes=relationship("Note",back_populates="user")

class Note(db.Model):
    __tablename__="notes"
    id:Mapped[int]=mapped_column(Integer,primary_key=True)
    title:Mapped[str]=mapped_column(String(250),nullable=False)
    content:Mapped[str]=mapped_column(String(250),nullable=False)
    date: Mapped[str] = mapped_column(String(250), nullable=False)
    # relationship(user)
    user_id:Mapped[int]=mapped_column(Integer,db.ForeignKey("users.id"))
    user=relationship("User",back_populates="notes")

# Create table schema in the database. Requires application context.
with app.app_context():
    db.create_all()

# Login Manager
login_manager=LoginManager()
login_manager.init_app(app)

@login_manager.user_loader
def load_user(user_id):
    return db.get_or_404(User,user_id)


@app.route('/')
def home():
    if current_user.is_authenticated:
        with app.app_context():
            notes_result=db.session.execute(db.select(Note).where(Note.user_id==current_user.id)).scalars().all()
            for note in notes_result:
                note.content=note.content[:75]+"..."
        return render_template('home.html',note_data=notes_result,logged_in=current_user.is_authenticated,logged_user=current_user.username)
    return redirect(url_for("login"))

@app.route('/login',methods=['GET','POST'])
def login():
    login_form=LoginForm()
    if login_form.validate_on_submit():
        with app.app_context():
            user_result=db.session.execute(db.select(User).where(User.username==login_form.username.data)).scalar()

            if user_result:
                if check_password_hash(user_result.password,login_form.password.data):

                    login_user(user_result)
                    return redirect(url_for('home'))
            flash("ユーザー名かパスワードに誤りがあります。")
            return render_template("login.html",form=login_form)
    return render_template("login.html",form=login_form)


@app.route('/register',methods=['GET','POST'])
def register():
    register_form=RegisterForm()
    if register_form.validate_on_submit():
        user_result=db.session.execute(db.select(User).where(User.username==register_form.username.data)).scalar()
        if user_result:
            flash("既にユーザー登録されています。")
            return render_template("register.html",form=register_form)
        with app.app_context():
            new_user=User(
                username=register_form.username.data,
                password=generate_password_hash(register_form.password.data,method="pbkdf2",salt_length=8),
                )
            db.session.add(new_user)
            db.session.commit()
            login_user(new_user)
        return redirect(url_for('home'))
    return render_template("register.html",form=register_form)

@app.route("/note_edit/<int:note_id>",methods=["GET","POST"])
@login_required
def note_edit(note_id):
    note_result=db.session.execute(db.select(Note).where(Note.id==note_id)).scalar()
    if request.method=='GET':
        return render_template('note.html',note_data=note_result)
    else:
        note_result.title=request.form['title']
        note_result.content=request.form['content']
        db.session.commit()
        return redirect(url_for('home'))

@app.route("/note_create",methods=["GET","POST"])
@login_required
def note_create():
    if request.method=='GET':
        return render_template('note.html',note_data=None)
    else:
        with app.app_context():
            new_note=Note(
                title=request.form['title'],
                content=request.form['content'],
                date=date.today().strftime("%B %d, %Y"),
                user=current_user)
            db.session.add(new_note)
            db.session.commit()
        return redirect(url_for('home'))


@app.route("/note_delete/<int:note_id>",methods=["GET","POST"])
@login_required
def note_delete(note_id):
    print(note_id)
    with app.app_context():
        note_to_delete=db.session.execute(db.select(Note).where(Note.id==note_id)).scalar()
        db.session.delete(note_to_delete)
        db.session.commit()
    return redirect('/')

@app.route("/logout",methods=["GET"])
@login_required
def logout():
    logout_user()
    return redirect(url_for("login"))

if __name__=='__main__':
    app.run(debug=True)
次からは、main.pyファイルの各パートについて解説していきます。
1.1 インポートと初期設定
from flask import Flask, render_template, request, redirect, url_for, flash
from flask_bootstrap import Bootstrap
from flask_sqlalchemy import SQLAlchemy
from sqlalchemy.orm import DeclarativeBase, Mapped, mapped_column, relationship
from sqlalchemy import Integer, String
from flask_login import UserMixin, login_user, LoginManager, login_required, current_user, logout_user
from werkzeug.security import generate_password_hash, check_password_hash
from forms import LoginForm, RegisterForm
from datetime import date
これらの行では、必要なモジュールをインポートしています。
Flask:Webアプリケーションフレームワークrender_template:HTMLテンプレートをレンダリングするための関数request:HTTPリクエストを処理するためのオブジェクトredirect,url_for:ページリダイレクト用の関数flash:ユーザーへのメッセージを表示するための関数Bootstrap:CSSフレームワークSQLAlchemy:データベース操作のためのORMUserMixin,login_userなど:ユーザー認証関連の機能generate_password_hash,check_password_hash:パスワードのハッシュ化と検証LoginForm,RegisterForm:フォーム処理用のクラス(forms.pyから)
app = Flask(__name__)
app.secret_key = "fresgresgesr"
bootstrap = Bootstrap(app)
Flaskアプリケーションを初期化します。
secret_keyを設定し、セッション管理やCSRF保護を有効にします。- Bootstrapを初期化し、CSSフレームワークを使用可能にします。
1.2 データベース設定
class Base(DeclarativeBase):
    pass

app.config['SQLALCHEMY_DATABASE_URI'] = "sqlite:///new-notes-collection.db"
db = SQLAlchemy(model_class=Base)
db.init_app(app)Baseクラスを定義し、SQLAlchemyのモデルの基底クラスとします。- データベースのURIを設定します。ここではSQLiteを使用し、ファイル名は “new-notes-collection.db” です。
- SQLAlchemyのインスタンスを作成し、アプリケーションと関連付けます。
RDBMSはSQLiteを使用しています。
class User(UserMixin, db.Model):
    __tablename__ = "users"
    id: Mapped[int] = mapped_column(Integer, primary_key=True)
    username: Mapped[str] = mapped_column(String(250), unique=True, nullable=False)
    password: Mapped[str] = mapped_column(String(250), nullable=False)
notes = relationship("Note", back_populates="user")Userモデルを定義します。これはデータベースの “users” テーブルに対応します。
UserMixinを継承し、Flask-Loginに必要なメソッドを提供します。id、username、passwordフィールドを定義します。notesはNoteモデルとの関係を定義します(1対多の関係)。
class Note(db.Model):
    __tablename__ = "notes"
    id: Mapped[int] = mapped_column(Integer, primary_key=True)
    title: Mapped[str] = mapped_column(String(250), nullable=False)
    content: Mapped[str] = mapped_column(String(250), nullable=False)
    date: Mapped[str] = mapped_column(String(250), nullable=False)
    user_id: Mapped[int] = mapped_column(Integer, db.ForeignKey("users.id"))
user = relationship("User", back_populates="notes")Noteモデルを定義します。これは “notes” テーブルに対応します。
id、title、content、dateフィールドを定義します。user_idは外部キーとしてUserモデルのidを参照します。userはUserモデルとの関係を定義します(多対1の関係)。
with app.app_context():
db.create_all()- アプリケーションのコンテキスト内でデータベースのテーブルを作成します。
1.3 ログイン管理
login_manager = LoginManager()
login_manager.init_app(app)

@login_manager.user_loader
def load_user(user_id):
return db.get_or_404(User, user_id)LoginManagerを初期化し、アプリケーションに関連付けます。user_loaderデコレータを使用して、ユーザーIDからユーザーオブジェクトを取得する関数を定義します。
1.4 ルート定義
1. ホームページ
@app.route('/')
def home():
    if current_user.is_authenticated:
        with app.app_context():
            notes_result = db.session.execute(db.select(Note).where(Note.user_id == current_user.id)).scalars().all()
            for note in notes_result:
                note.content = note.content[:75] + "..."
        return render_template('home.html', note_data=notes_result, logged_in=current_user.is_authenticated, logged_user=current_user.username)
return redirect(url_for("login"))- ホームページのルートを定義します。
- ユーザーが認証されている場合、そのユーザーのノートを取得します。
- 各ノートの内容を75文字に制限します。
- 認証されていない場合、ログインページにリダイレクトします。
2. ログイン
@app.route('/login', methods=['GET', 'POST'])
def login():
    login_form = LoginForm()
    if login_form.validate_on_submit():
        with app.app_context():
            user_result = db.session.execute(db.select(User).where(User.username == login_form.username.data)).scalar()

            if user_result:
                if check_password_hash(user_result.password, login_form.password.data):
                    login_user(user_result)
                    return redirect(url_for('home'))
        flash("ユーザー名かパスワードに誤りがあります。")
        return render_template("login.html", form=login_form)
return render_template("login.html", form=login_form)- ログインページのルートを定義します。
- フォームが送信された場合、ユーザー名とパスワードを検証します。
- 認証に成功した場合、ユーザーをログインさせてホームページにリダイレクトします。
- 失敗した場合、エラーメッセージを表示します。
3. ユーザー登録
@app.route('/register', methods=['GET', 'POST'])
def register():
    register_form = RegisterForm()
    if register_form.validate_on_submit():
        user_result = db.session.execute(db.select(User).where(User.username == register_form.username.data)).scalar()
        if user_result:
            flash("既にユーザー登録されています。")
            return render_template("register.html", form=register_form)
        with app.app_context():
            new_user = User(
                username=register_form.username.data,
                password=generate_password_hash(register_form.password.data, method="pbkdf2", salt_length=8),
            )
            db.session.add(new_user)
            db.session.commit()
            login_user(new_user)
        return redirect(url_for('home'))
return render_template("register.html", form=register_form)- ユーザー登録ページのルートを定義します。
- フォームが送信された場合、ユーザー名の重複をチェックします。
- 新しいユーザーを作成し、パスワードをハッシュ化して保存します。
- 登録後、自動的にログインしてホームページにリダイレクトします。
4. ノート編集
@app.route("/note_edit/<int:note_id>", methods=["GET", "POST"])
@login_required
def note_edit(note_id):
    note_result = db.session.execute(db.select(Note).where(Note.id == note_id)).scalar()
    if request.method == 'GET':
        return render_template('note.html', note_data=note_result)
    else:
        note_result.title = request.form['title']
        note_result.content = request.form['content']
        db.session.commit()
return redirect(url_for('home'))- ノート編集ページのルートを定義します。
login_requiredデコレータを使用して、ログインユーザーのみアクセスを許可します。- GETリクエストの場合、編集フォームを表示します。
- POSTリクエストの場合、ノートを更新してホームページにリダイレクトします。
5. ノート作成
@app.route("/note_create", methods=["GET", "POST"])
@login_required
def note_create():
    if request.method == 'GET':
        return render_template('note.html', note_data=None)
    else:
        with app.app_context():
            new_note = Note(
                title=request.form['title'],
                content=request.form['content'],
                date=date.today().strftime("%B %d, %Y"),
                user=current_user)
            db.session.add(new_note)
            db.session.commit()
return redirect(url_for('home'))- 新規ノート作成ページのルートを定義します。
- GETリクエストの場合、空のフォームを表示します。
- POSTリクエストの場合、新しいノートを作成してホームページにリダイレクトします。
6. ノート削除
@app.route("/note_delete/<int:note_id>", methods=["GET", "POST"])
@login_required
def note_delete(note_id):
    print(note_id)
    with app.app_context():
        note_to_delete = db.session.execute(db.select(Note).where(Note.id == note_id)).scalar()
        db.session.delete(note_to_delete)
        db.session.commit()
return redirect('/')- ノート削除機能のルートを定義します。
- 指定されたIDのノートを削除し、ホームページにリダイレクトします。
7. ログアウト
@app.route("/logout", methods=["GET"])
@login_required
def logout():
    logout_user()
return redirect(url_for("login"))- ログアウト機能のルートを定義します。
- ユーザーをログアウトさせ、ログインページにリダイレクトします。
1.5 アプリケーションの実行
if __name__ == '__main__':
app.run(debug=True)- このスクリプトが直接実行された場合、Flaskアプリケーションを開発モードで実行します。
この詳細な解説により、Flaskを使用したメモアプリケーションの各部分の機能と役割がより明確になったと思います。各ルートやデータベース操作、認証プロセスなどが段階的に実装されていることがわかります。
2. forms.pyファイル解説
2.0 コード全体
from flask_wtf import FlaskForm
from wtforms import StringField,PasswordField,SubmitField
from wtforms.validators import DataRequired


class LoginForm(FlaskForm):
    username=StringField(label='ユーザー名',validators=[DataRequired()])
    password=PasswordField(label="パスワード",validators=[DataRequired()])
    submit=SubmitField(label="ログイン")

class RegisterForm(FlaskForm):
    username=StringField(label='ユーザー名',validators=[DataRequired()])
    password=PasswordField(label="パスワード",validators=[DataRequired()])
    submit=SubmitField(label="登録")
forms.pyファイルは、Webフォームを定義するためのクラスを含んでいます。これらのフォームは、ユーザーからの入力を受け取り、バリデーション(入力値の検証)を行うために使用されます。
2.1 インポート
from flask_wtf import FlaskForm
from wtforms import StringField, PasswordField, SubmitField
from wtforms.validators import DataRequiredFlaskForm: Flask-WTFの基本フォームクラスをインポートします。これはFlaskアプリケーションでWTFormsを簡単に使用するためのベースクラスです。StringField,PasswordField,SubmitField: フォームのフィールドタイプをインポートします。StringField: 通常のテキスト入力フィールドPasswordField: パスワード入力フィールド(入力が*で隠されます)SubmitField: フォーム送信ボタンDataRequired: フィールドが空でないことを確認するバリデータをインポートします。
2.2 ログインフォーム
class LoginForm(FlaskForm):
    username = StringField(label='ユーザー名', validators=[DataRequired()])
    password = PasswordField(label="パスワード", validators=[DataRequired()])
submit = SubmitField(label="ログイン")LoginFormクラスはFlaskFormを継承しています。
username: ユーザー名入力用のStringFieldを定義します。label='ユーザー名': フィールドのラベルを設定します。validators=[DataRequired()]: このフィールドが必須であることを指定します。password: パスワード入力用のPasswordFieldを定義します。label="パスワード": フィールドのラベルを設定します。validators=[DataRequired()]: このフィールドも必須です。submit: フォーム送信ボタン用のSubmitFieldを定義します。label="ログイン": ボタンのテキストを設定します。
2.3 登録フォーム
class RegisterForm(FlaskForm):
    username = StringField(label='ユーザー名', validators=[DataRequired()])
    password = PasswordField(label="パスワード", validators=[DataRequired()])
submit = SubmitField(label="登録")RegisterFormクラスもFlaskFormを継承しています。フィールドの構造はLoginFormとほぼ同じですが、用途が異なります。
username: 新規ユーザー名入力用のStringFieldです。password: 新規パスワード入力用のPasswordFieldです。submit: フォーム送信ボタンのテキストが “登録” になっています。
2.4 フォームの使用
これらのフォームクラスは、main.pyファイル内で以下のように使用されます:
- ビュー関数内でフォームのインスタンスを作成します。
例:login_form = LoginForm() - テンプレート(HTML)にフォームを渡します。
例:render_template("login.html", form=login_form) - フォームのバリデーションを行います。
例:if login_form.validate_on_submit(): - フォームのデータにアクセスします。
例:login_form.username.data
これらのフォームクラスを使用することで、HTML内でのフォーム構築が簡素化され、サーバーサイドでの入力検証が容易になります。また、CSRFトップピンも自動的に処理されるため、セキュリティも向上します。
3. テンプレートファイルの解説
3.1 base.html
<html lang="en">
<head>
    <meta charset="UTF-8">
    <meta name="viewport" content="width=device-width, initial-scale=1.0">
    <title>Note App</title>
    <link href="https://cdn.jsdelivr.net/npm/bootstrap@5.3.0/dist/css/bootstrap.min.css" rel="stylesheet" integrity="sha384-9ndCyUaIbzAi2FUVXJi0CjmCapSmO7SnpJef0486qhLnuZ2cdeRhO02iuK6FUUVM" crossorigin="anonymous">
     {% block style %}
     {% endblock %}
     <script src="https://cdn.jsdelivr.net/npm/bootstrap@5.3.0/dist/js/bootstrap.bundle.min.js" integrity="sha384-geWF76RCwLtnZ8qwWowPQNguL3RmwHVBC9FhGdlKrxdiJJigb/j/68SIy3Te4Bkz" crossorigin="anonymous"></script>
</head>
{% block content %}
{% endblock %}
</html>
base.htmlは、アプリケーション全体で共有されるベーステンプレートです。このファイルはFlaskのテンプレート継承機能を利用しており、他のテンプレートファイルの基礎となります。
テンプレートブロック
{% block style %}
{% endblock %}- これはFlaskのJinja2テンプレートエンジンの構文です。
styleという名前のブロックを定義しています。- 子テンプレートはこのブロック内にスタイル関連のコードを挿入できます。
{% block content %}
{% endblock %}contentという名前のブロックを定義しています。- 子テンプレートはこのブロック内にメインコンテンツを挿入します。
テンプレート継承の使用
このbase.htmlファイルは、他のテンプレートファイル(例:home.html, login.html)によって継承されます。子テンプレートは以下のように使用します:
{% extends "base.html" %}

{% block content %}
  <!-- ページ固有のコンテンツをここに記述 -->
{% endblock %}
この構造により、共通のHTML構造やスタイルシートのリンクを各ページで繰り返し記述する必要がなくなり、コードの重複を避けることができます。
3.2 home.html
{% extends "base.html" %}
{% block content %}
<body>
  <div class="container mb-5">
    <header class="d-flex justify-content-center py-3">
      <ul class="nav nav-pills">
        <li class="nav-item"><a href="{{url_for('home')}}" class="nav-link" aria-current="page">ホーム</a></li>
        {% if logged_in %}
        <li class="nav-item"><a href="{{url_for('logout')}}" class="nav-link">ログアウト</a></li>
        {% else %}
        <li class="nav-item"><a href="{{url_for('login')}}" class="nav-link">ログイン</a></li>
        {% endif %}

      </ul>
    </header>
  </div>
  <div class="px-4 text-center">
    <h2 class="display-6 fw-bold text-body-emphasis mb-4">メモ一覧</h2>
    <h4 class="display-10">ユーザー:{{logged_user}}</h4>
  </div>

  <div class="d-flex flex-column flex-md-row p-4 gap-4 py-md-5 align-items-center justify-content-center">
    {% if logged_in %}
    <div class="list-group" style="width: 50%;">
      {% for note in note_data%}
      <div class="d-flex">
      <a href="{{ url_for('note_edit',note_id=note.id) }}"
        class="list-group-item list-group-item-action d-flex gap-3 py-3" aria-current="true">
        <img src="{{url_for('static',filename='img/file-text.svg')}}" alt="twbs" width="32" height="32"
          class="flex-shrink-0">


        <div class="d-flex gap-2 w-100 justify-content-between">
          <div>
            <h6 class="mb-0">{{note.title}}</h6>
            <p class="mb-0 opacity-75">{{note.content}}</p>
          </div>
          <div>
            <small class="opacity-50 text-nowrap">{{note.date}}</small><br>
          </div>
        </div>
      </a>

    </div>
      {% endfor %}

    </div>
  </div>
  <div class="d-flex flex-column flex-md-row p-4 gap-4 py-md-5 align-items-center justify-content-center">
      <a href="{{url_for('note_create')}}" class="btn btn-primary w-25 py-2" >新規登録</a>
  </div>
  {% endif %}

</body>

{% endblock %}
home.htmlは、ユーザーのホームページを表示するテンプレートです。このファイルはbase.htmlを継承し、Flaskの様々な機能を活用しています。
テンプレート継承
{% extends "base.html" %}
{% block content %}
<!-- コンテンツ -->
{% endblock %}
extends "base.html": base.htmlテンプレートを継承しています。block content: base.htmlで定義されたcontentブロックを上書きしています。
URL生成
<li class="nav-item"><a href="{{url_for('home')}}" class="nav-link" aria-current="page">ホーム</a></li>url_for('home'): Flaskのurl_for関数を使用して、’home’ビュー関数に対応するURLを動的に生成しています。- 同様の方法で、’logout’、’login’、’note_edit’、’note_create’のURLも生成しています。
条件分岐
{% if logged_in %}
<li class="nav-item"><a href="{{url_for('logout')}}" class="nav-link">ログアウト</a></li>
{% else %}
<li class="nav-item"><a href="{{url_for('login')}}" class="nav-link">ログイン</a></li>
{% endif %}- Jinja2のif文を使用して、ユーザーのログイン状態に応じて表示を切り替えています。
logged_in変数は、Flaskのビュー関数から渡されたものです。
変数の表示
<h4 class="display-10">ユーザー:{{logged_user}}</h4>{{logged_user}}: Flaskのビュー関数から渡されたlogged_user変数の値を表示しています。
ループ処理
{% for note in note_data %}
<!-- ノートの表示処理 -->
{% endfor %}- Jinja2のfor文を使用して、
note_dataリスト内の各ノートを繰り返し処理しています。 note_dataもFlaskのビュー関数から渡されたものです。
動的URL生成とパラメータ渡し
<a href="{{ url_for('note_edit', note_id=note.id) }}" class="list-group-item list-group-item-action d-flex gap-3 py-3" aria-current="true">url_for('note_edit', note_id=note.id): ‘note_edit’ビュー関数へのURLを生成し、note_idパラメータを渡しています。- これにより、各ノートの編集ページへのリンクが動的に生成されます。
静的ファイルの参照
<img src="{{url_for('static', filename='img/file-text.svg')}}" alt="twbs" width="32" height="32" class="flex-shrink-0">url_for('static', filename='img/file-text.svg'): 静的ファイル(この場合は画像)のURLを生成しています。- これにより、Flaskの静的ファイル管理機能を利用しています。
このhome.htmlテンプレートは、Flaskの多くの機能を活用して動的なコンテンツを生成しています。ユーザーの状態に応じた表示の切り替え、データベースから取得したノート情報の表示、各種リンクの動的生成などが実現されています。
3.3 login.html
{% extends "base.html" %}
{% from "bootstrap5/form.html" import render_form %}

{% block style %}
<link rel="stylesheet" href="{{ url_for('static', filename='css/login.css') }}">
{% endblock %}

{% block content %}
<body class="d-flex align-items-center py-1 bg-body-tertiary">

    <main class="form-signin w-100 m-auto">
        <form action="{{url_for('login')}}" method="post">
            <img class="mb-4" src="{{url_for('static',filename='img/person-check.svg')}}" alt="" width="72" height="57">
            <h1 class="h3 mb-3 fw-normal">ログイン</h1>
            {% with messages = get_flashed_messages()%}
            {% if messages %}
            {% for msg in messages %}
            <p class="flash" style="color: red;">{{msg}}</p>
            {% endfor %}
            {% endif %}
            {% endwith %}
            {{ render_form(form, novalidate=True, button_map={"submit": "primary"}) }}
            <p>※ユーザー登録は<a href="{{url_for('register')}}" >こちら</a>をクリック</p>

        </form>
    </main>

</body>
{% endblock %}
login.htmlは、ユーザーログインページを表示するテンプレートです。このファイルはbase.htmlを継承し、Flask-Bootstrapの機能を活用しています。
テンプレート継承とマクロのインポート
{% extends "base.html" %}
{% from "bootstrap5/form.html" import render_form %}
extends "base.html": base.htmlテンプレートを継承しています。from "bootstrap5/form.html" import render_form: Flask-Bootstrapのフォームレンダリングマクロをインポートしています。
カスタムスタイルの追加
{% block style %}
<link rel="stylesheet" href="{{ url_for('static', filename='css/login.css') }}">
{% endblock %}- base.htmlで定義された
styleブロックを上書きしています。 - ログインページ専用のCSSファイルを読み込んでいます。
フォームの動的生成
<form action="{{url_for('login')}}" method="post">
    <!-- フォームの内容 -->
    {{ render_form(form, novalidate=True, button_map={"submit": "primary"}) }}
</form>action="{{url_for('login')}}": フォームの送信先URLを動的に生成しています。{{ render_form(form, novalidate=True, button_map={"submit": "primary"}) }}: Flask-Bootstrapのrender_formマクロを使用して、Pythonで定義したフォームを自動的にレンダリングしています。
フラッシュメッセージの表示
{% with messages = get_flashed_messages()%}
{% if messages %}
{% for msg in messages %}
<p class="flash" style="color: red;">{{msg}}</p>
{% endfor %}
{% endif %}
{% endwith %}get_flashed_messages(): Flaskのフラッシュメッセージ機能を使用しています。- サーバーサイドから送られたメッセージ(エラーメッセージなど)を表示します。
このテンプレートは、ユーザー認証システムの重要な部分を担っており、セキュアで使いやすいログインインターフェースを提供しています。
3.4 register.html
{% extends "base.html" %}
{% from "bootstrap5/form.html" import render_form %}
{% block style %}
<link rel="stylesheet" href="{{ url_for('static', filename='css/login.css') }}">
{% endblock %}

{% block content %}
<body class="d-flex align-items-center py-4 bg-body-tertiary">

    <main class="form-signin w-100 m-auto">
        <form action="/register" method="post">
            <img class="mb-4" src="{{url_for('static',filename='img/person-add.svg')}}" alt="" width="72" height="57">
            <h1 class="h3 mb-3 fw-normal">ユーザー登録</h1>
            {% with messages = get_flashed_messages()%}
            {% if messages %}
            {% for msg in messages %}
            <p class="flash" style="color: red;">{{msg}}</p>
            {% endfor %}
            {% endif %}
            {% endwith %}
            {{ render_form(form, novalidate=True, button_map={"submit": "primary"}) }}
            <p>※ログインは<a href="{{url_for('login')}}" >こちら</a>をクリック</p>
        </form>
    </main>

</body>
{% endblock %}
このファイルは、ユーザー登録ページのHTMLテンプレートを定義しています。記述はlogin.htmlとほぼ同じなので、解説は割愛します。
3.5 note.html
{% extends "base.html" %}
{% block style %}
<link rel="stylesheet" href="{{ url_for('static', filename='css/login.css') }}">
{% endblock %}

{% block content %}
<body class="py-4 bg-body-tertiary">

    <main class="form-signin w-100 m-auto" style="max-width: 900px;">
        {% if note_data.id==Null: %}
        <form action="/note_create" method="post">
        {% else: %}
        <form action="/note_edit/{{note_data.id}}" method="post">
        {% endif %}
            <img class="mb-4" src="/static/img/file-text.svg" alt="" width="72" height="57">
            <h1 class="h3 mb-5 fw-normal">メモ編集</h1>
            <div class="mb-4">
                {% if note_data.id!=Null: %}
                <p style="text-align:right;margin-bottom: 0;"><a href="{{url_for('note_delete', note_id=note_data.id) }}">削除</a></p>
                {% endif %}
                <label for="floatingInput" class="form-label">タイトル</label>

                <input type="text" class="form-control" id="floatingInput" name="title" value="{{note_data.title}}">
            </div>
            <div class="mb-5">
                <label for="exampleFormControlTextarea1" class="form-label">内容</label>
                <textarea class="form-control" id="exampleFormControlTextarea1" rows="5" name="content">{{note_data.content}}</textarea>
              </div>

            <div class="form-floating" style="text-align: center;">
                <a class="btn btn-outline-secondary w-25 me-5 py-2" href="{{url_for('home')}}">戻る</a>
                <button class="btn btn-primary w-25 py-2" type="submit">保存</button>
            </div>

            <p class="mt-5 mb-3 text-body-secondary">© 2017–2024</p>
        </form>
    </main>


</body>
{% endblock %}
このファイルは、メモの作成と編集のためのHTMLテンプレートを定義しています。Flaskアプリケーションで使用され、動的にHTMLを生成します。以下、各部分を詳しく見ていきましょう。
フォームの条件分岐
{% if note_data.id==Null: %}
<form action="/note_create" method="post">
{% else: %}
<form action="/note_edit/{{note_data.id}}" method="post">
{% endif %}- この部分は、新規作成か既存のメモの編集かを判断します。
- 新規作成の場合は
/note_createに、編集の場合は/note_edit/メモIDにフォームを送信します。
メモの削除リンク
{% if note_data.id!=Null: %}
<p style="text-align:right;margin-bottom: 0;"><a href="{{url_for('note_delete', note_id=note_data.id) }}">削除</a></p>
{% endif %}- 既存のメモを編集する場合のみ、削除リンクが表示されます。
フォームの内容
<input type="text" class="form-control" id="floatingInput" name="title" value="{{note_data.title}}">
...
<textarea class="form-control" id="exampleFormControlTextarea1" rows="5" name="content">{{note_data.content}}</textarea>- タイトルと内容を入力するフィールドが用意されています。
{{note_data.title}}と{{note_data.content}}で、既存のメモデータが表示されます。
ボタン
<a class="btn btn-outline-secondary w-25 me-5 py-2" href="{{url_for('home')}}">戻る</a>
<button class="btn btn-primary w-25 py-2" type="submit">保存</button>- 「戻る」ボタンでホームページに戻ります。
- 「保存」ボタンでフォームを送信し、メモを保存します。
このテンプレートは、ユーザーフレンドリーなメモ編集フォームを作成し、Flaskアプリケーションと連携してメモの作成、編集、削除の処理を行います。
まとめ
本記事では、Pythonの軽量WebフレームワークであるFlaskを使用して、メモ帳を作成する方法を紹介しました。このプロジェクトを通じて、Webアプリケーション開発の基本的な概念や、Flaskの特徴である軽量性と柔軟性を学ぶことができます。


